I loved this page and cannot wait to get some pictures of Caden this winter and put it all together! Don't you just love the weave of the grosgrain ribbon? The "O" in snow is done by doing the Faux Metal technique. How cool! We had a lot of fun doing this! Cold Play stamp set make an adorable Snow Man!
Tuesday, October 16, 2007
True Friend Scrapbook Page
This page turned out so cute! We did this at my October Scrap club. I got the idea from a magazine. We took the ribbon and twisted it down the border. It's held in place by mini glue dots and then accented by using vintage brads. We used the Wheel Aligner to make the borders on the picture mats. Fun page!
Thursday, October 4, 2007
Last night I had my stamp club and I wanted to share with you what we made. I think I am going to be a bit ambitious this year and make one of these for all of my guest at Thanksgiving. This is my first year (in 24) to host Thanksgiving dinner! I am a bit nervous about making that turkey!!! I thought if my turkey didn't turn out, at least they would have this cute gift to take home with them! I am going to fill it with some candy for them!
Stamping Invitations
Hello! Well if you have had a workshop for me you know that I love to stamp your invitations to your workshop! This morning I was playing around and stampin some invitations for an upcoming workshop and they turned out so cute I wanted to share them with you! I used the Carved and Candlelit stamp set with Only Orange, Glorious Green and Basic Black. I used the masking technique on these and just love the way they turned out! Check it out!
Thursday, September 27, 2007
Hello! Well I spent my morning playing! I was really in the mood to "color" so I broke out my chalks and away I went! I had a bunch of birthday cards to make and this is what I did. It was easy and really back to the basics! I used Itty Bitty Bkgrds., Sincere Salutations and Give Thanks. The colors are Real Red, Gable Green and Whisper White. I had a good time playing with my chalks! Maybe you should get yours back out and see what you can come up! My new favorite tool is the "Crop A Dile"! What a cool way to punch your holes and set your eyelets....QUIETLY! Let me know what you think...you all are being awfully quiet out there!
Thursday, September 20, 2007
Hello! This is another page that we did at my Scrap Club! We used More Mustard, Really Rust and Very Vanilla cardstocks. The images are from Leave Awash Jumbo Wheet and Big Deal Alphabet. I have had the Wheel Aligner for a long time now and just decided to learn how to "Miter" my edges for this page. That is a really cool way to frame your page! We then used sponges and classic inks Not Quite Navy, More Mustard and Really Rust and just rubbed the colors over the Basic Black. I also used Jumbo Pewter Eyelets to accessorize this page. Enjoy and let me know what you think!
Thursday, September 13, 2007
Hi All! A couple of months ago I started a new Scrap Club and I am loving it! It is really fun and helping me to get pages done that I need for my own scrap book! This page here is done with Wild Rose and Wild West Alphabet. I am loving that new alphabet! We used Brilliant Blue, Ballet Blue, Wild Wasabi & Garden Green ink. The cardstock is Ballet Blue, Brilliant Blue and Whisper White. There was a lot of cutting involved in this, but it is worth it in the end when you use dimensionals to pop up the flowers!!
Thursday, September 6, 2007
Pretties Class Projects
Hello Everyone! It has been quite some time since I've posted...I am spinning just wondering where did the summer go? Charlie is back in school and it seems like life is getting back to normal! Hopefully I will be able to keep up with the posting now! Steve and I have spent many weekends this past summer riding our motorcycles. We have had a lot of fun!! We also got bicycles too....thought we ought to get something that will make us do a little exercise instead of it all being motorized!!
I had my pretties class a while back and thought I would show you what we did. The cards turned out great! All we did was use re-inkers and aquapainters to get the colors for the pretties! How simple! You can also color them with you Watercolor WonderCrayons and them blend with the aquapainters too! We gussied them up a bit with glitter and hat pins too! And...did you know that after you color them, stamp the with a background using craft ink! That gives it a cool look too! I will have another Pretties class in the future, so keep you eyes opened for that information!!
Friday, August 3, 2007
More Pretties!
This was another one done in club using Give Thanks stamp set. I love that one!! We used Creamy Caramel, Pumpkin Pie, Always Artichoke and Very Vanilla cardstock. The ink used was Basic Black. We used the Watercolor Wondercrayons to color in the images and to also dye the flower! We simply colored the flower with the crayon and used the Aqua Painter to blend it in. The Rhinestone Brad is part of the Pretties kit!! We used the Crafter's Tool Kit to pierce the corners of the cardstock on the sunflower.
Pretties again!
We did some Pretties projects again during this past club and we had a ball playing with them. This one we used Wild Rose stamp set with Orchid Opulance, Lovely Lilac, Wild Wasabit and Garden Green inks. Orchid Opulance and Very Vanilla was the cardstock used. We used the Aqua Painters and re-inkers to dye the flower. I am loving these Pretties! What do you think?
Saturday, July 28, 2007
6X6 Scrap Camp
Hello All! These pictures are from the 6x6 Scrap Camp that we did last night! We used the Secret Garden Simply Scrappin' Kits! I was so excited to see that the kits came with all Textured Cardstock! How cool is that, eh? (Kerri that was for you!) We just simply added some embelishments by using punches, brads and ribbns. There is so much you can do with these kits to make beautiful scrapbook pages. Let me know what you think!! Keep an eye on my calendar on my website, I'll be having another class in the not to distant future!
Thursday, July 26, 2007
Happy New Year Cello Bag
This cello bag is a perfect gift for those attending a birthday party! You can fill it with many different kinds of item! We used Pick A Petal and Happy Everything stamp sets. The background was stamped using Dotted. We used Pixie Pink, Tempting Torquoise and Gable Green inks. The middle of the flower was done by using our new Scalloped Circle punch on Pixie Pink cardstock. We then inked the cardstock piece with VersaMark and embossed Irredescent Ice embossing powder on it. Gives it that extra POP! The Rounded Tab punch was used on the "Birthday" piece and held with a Bold Bright brad. Who wouldn't love to get one of these at a party??
Happy New Year!
This card uses our new Three For You Punchbox. I absolutely love this punchbox! There are so many possibilities with it! We used Wild Wasabe, Blue Bayou and River Rock cardstock, Wild Wasabe ink and the new Groovy Guava Double Stiched ribbon! Sterling Silver brads were added for accents..what do you think?
Happy New Year Workshop!
Here are the projects that we did at the New Year Workshop last week. We had a great time drinking bubbly GRAPE JUICE and stamping! This project uses the Borouque Motiffs stamp set with Purely Pomegranate Textured Cardstock! The textured cardstock is totally awesome! We used Purely Pomegranate and Groovy Guava ink with a little bit of Dazzling Diamonds. The ribbon is our new Taffeta white ribbon. This is a very elegant ribbon and goes wonderful with this card.
Wednesday, July 25, 2007
Me & My Motorcycle
Playing with Pretties
I received my Pretties Kit and couldn't wait to sit down and start playing with it! The top card is done with Borouqe Motiffs (my new favorite set), Groovy Guava and Purely Pomegranate inks. I took the Pretties flower and used the ink refill and Aqua Painter to get the color to match!
The second one was done the same way! I used Soft Sky ink on this one. The new Groovy Guava Double Stitched ribbon is awesome! Note the rinestone brad used on the flower....these come with the kit!!! This is just a sampling of what we will be doing at my Pretties class on August 15...so don't delay!!! Sign up now! Class fee is $35.00 and includes your own Pretties Kit!
Thursday, July 12, 2007
This is my Fourth of July page we did in club! We used some On-Board Accents with craft ink and embossed the accents with Irredescent Ice embossing powder! Gives it that special POP to make it stand out! We used Headline alphabet for this one with some Bold Brights Brads. Brilliant Blue and Real Red cardstock was used for this project!
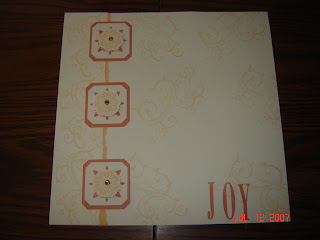
Hello Everyone! It has been a bit since I've posted but I have a couple of scrapbook pages to share with you! The first one is done with a new stamp set for the Fall/Winter Collection. Click here to view the catalog. The set is called Baroque Motifs and we used Apricot Appeal and Groovy Guava (new In Color!) and some of the new Rinestone Brads! We used Letterpress Alphabet for the "JOY"! I absolutely love the jumbo alphabet and believe that every scrapper needs to have at least one set! Check it out and let me know what you think!
Monday, July 2, 2007
Hi Everyone! I hope you all have some wonderful plans for the 4th of July! Hard to believe that we are already into July! WOW! This summer is flying by! This card here was done at my HodgePodge Hardware class. We used the Watercolor Garden set (now retired), Itty Bitty Backgrounds and the Aged Copper HodgePodge Hardware! Colors are Apricot Appeal, Pale Plum, Mellow Moss and Bashful Blue! What do you think?
Thursday, June 21, 2007
Retired Accessories!
Hello all! The Retired Accessorie list is out and let me tell you...it's a LONG one!! Be sure to check it out by clicking here. Be sure to call me by June 26 to order these items before they are gone! Remember the color coding...Green (sufficient supply), yellow (going quickly), and pink (no longer available)!!
Also, our Annual Open House has been confirmed! It is scheduled for Saturday 14 from 12-4 at the Lifespring Christian Church, 1373 West Galbraith Road, Cincinnati, OH. Plan on coming and spending some time with us in the afternoon to view the new catalog, shop and watch some great demonstrations! We will be having a lot of door prize drawings as well! Plenty of food to share and ideas to look at! I look forward to catching up with you!
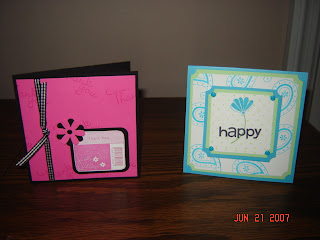
Last post for today! These cards were also done at my camp. They were so very simple but the end results were great! We used Polka Dots & Paisley stamp set with Tempting Torquoise and Gable Green Cardstock and ink. Don't you think the ticket corner punch and Tempting Torquoise brads just bring this all together? The second card was done with Best Barcodes and Much Appreciated stamp sets. I used Pink Passion and Basic Black cardstock. The Daisy Punch, Vintage Brad and Black Gingham ribbon finished this one off!
This is my first attempt at a 5 in 1 template box! This was so very easy and I was pleased at the outcome! We did this project at my last stamp camp and had so much fun doing it too! I love how you can use our products for so many different things....like the envelope template and designers series paper! Let me know what you think of this one! I can't wait to put a gift in it and give it to someone!
I love making projects that help to decorate my home. They always get a comment from someone who comes to visit, like this next project! I learned this technique when I went on the cruise to the Panamal Canal in April. All you need are stamps, craft ink, glassy glaze embossing powder, tile and an oven! Be sure to clean your tile off before you stamp on it with your craft ink! Then apply the glassy glaze e.p. and shake off the excess. Bake in your oven at 325 for 15 minutes! It's that easy! I used Whimsical Alpha and Doodle This for this project. The "F" is from Headline! Have fun with this one, just be sure to take the sticker off the back of the tile before you bake it!
Wednesday, June 20, 2007
Here is another project that we did at my last stamp camp. It is a cute post it note holder! We used Roses In Winter for the background and Rose Grosgrain ribbon. Whimsical Alphabet was used in Basic Black for the word. I bought the picture fram from Target for .97. This would make an adorable addition to any person's desk! Don't you think?
Hi Ladies! Wow! What HOT weather we are having, huh? I am not going to complain because it was only 3 months ago that I couldn't wait for it to get hot! That has not stopped me from stamping though! This adorable "Coaster Picture Frame" was made at my last Stamp Camp! I used a 4x4 chipboard coaster, Itty Bitty Borders, Real Red, Basic Black and Whisper White Cardstock! Punches helped me to made these adorable ladybugs as my accents! What do you think? Be sure to post your comments, I love to read them!
Thursday, June 7, 2007
Office Accoutrement
Hi All! What a beautiful day we are having! My stamp club and I got together last night and had a really great time stamping a 6x6 mini album! We used Office Accoutrement and Petals & Paisleys Designer Series paper to creat this project! Then we added some Twill Tape and ribbon, and a button to complete the accesories!
Monday, June 4, 2007
Hello Ladies! I wanted to take a minute and let all of you see what we did at the Doodle This & Doodle That class! We had such a great time stamping and snacking! Please stay tuned for a sneak peek at what we will be doing at the camp on June 15 and at the HodgePodge class on June 25! It is still not too late to sign up for the HodgePodge class!
Thursday, May 24, 2007
Welcome!!
Hi Everyone! I am so excited about this new way of being able to keep in touch with all of you! My goal for my blog is to be able to keep you updated daily on what is going on with my stamping business so that you can continually be a part of it. I hope to be able to display projects that we have made at camps and projects that we will be making at future classes too! So come on and enjoy the fun with me! Also, if you have comments please let me know!
Subscribe to:
Posts (Atom)