Hello all! The Retired Accessorie list is out and let me tell you...it's a LONG one!! Be sure to check it out by clicking here. Be sure to call me by June 26 to order these items before they are gone! Remember the color coding...Green (sufficient supply), yellow (going quickly), and pink (no longer available)!!
Also, our Annual Open House has been confirmed! It is scheduled for Saturday 14 from 12-4 at the Lifespring Christian Church, 1373 West Galbraith Road, Cincinnati, OH. Plan on coming and spending some time with us in the afternoon to view the new catalog, shop and watch some great demonstrations! We will be having a lot of door prize drawings as well! Plenty of food to share and ideas to look at! I look forward to catching up with you!
Thursday, June 21, 2007

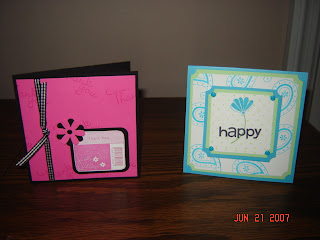
Last post for today! These cards were also done at my camp. They were so very simple but the end results were great! We used Polka Dots & Paisley stamp set with Tempting Torquoise and Gable Green Cardstock and ink. Don't you think the ticket corner punch and Tempting Torquoise brads just bring this all together? The second card was done with Best Barcodes and Much Appreciated stamp sets. I used Pink Passion and Basic Black cardstock. The Daisy Punch, Vintage Brad and Black Gingham ribbon finished this one off!

This is my first attempt at a 5 in 1 template box! This was so very easy and I was pleased at the outcome! We did this project at my last stamp camp and had so much fun doing it too! I love how you can use our products for so many different things....like the envelope template and designers series paper! Let me know what you think of this one! I can't wait to put a gift in it and give it to someone!

I love making projects that help to decorate my home. They always get a comment from someone who comes to visit, like this next project! I learned this technique when I went on the cruise to the Panamal Canal in April. All you need are stamps, craft ink, glassy glaze embossing powder, tile and an oven! Be sure to clean your tile off before you stamp on it with your craft ink! Then apply the glassy glaze e.p. and shake off the excess. Bake in your oven at 325 for 15 minutes! It's that easy! I used Whimsical Alpha and Doodle This for this project. The "F" is from Headline! Have fun with this one, just be sure to take the sticker off the back of the tile before you bake it!
Wednesday, June 20, 2007

Here is another project that we did at my last stamp camp. It is a cute post it note holder! We used Roses In Winter for the background and Rose Grosgrain ribbon. Whimsical Alphabet was used in Basic Black for the word. I bought the picture fram from Target for .97. This would make an adorable addition to any person's desk! Don't you think?

Hi Ladies! Wow! What HOT weather we are having, huh? I am not going to complain because it was only 3 months ago that I couldn't wait for it to get hot! That has not stopped me from stamping though! This adorable "Coaster Picture Frame" was made at my last Stamp Camp! I used a 4x4 chipboard coaster, Itty Bitty Borders, Real Red, Basic Black and Whisper White Cardstock! Punches helped me to made these adorable ladybugs as my accents! What do you think? Be sure to post your comments, I love to read them!
Thursday, June 7, 2007
Office Accoutrement


Hi All! What a beautiful day we are having! My stamp club and I got together last night and had a really great time stamping a 6x6 mini album! We used Office Accoutrement and Petals & Paisleys Designer Series paper to creat this project! Then we added some Twill Tape and ribbon, and a button to complete the accesories!
Monday, June 4, 2007

Hello Ladies! I wanted to take a minute and let all of you see what we did at the Doodle This & Doodle That class! We had such a great time stamping and snacking! Please stay tuned for a sneak peek at what we will be doing at the camp on June 15 and at the HodgePodge class on June 25! It is still not too late to sign up for the HodgePodge class!
Subscribe to:
Comments (Atom)
